Codex 开源的 Figma Skill 原理详解
一、Skill 的核心价值
解决的问题
•
效率低下: 重复的 UI 编码工作耗时
•
协作成本高: 设计师和开发者之间的沟通成本
提供的能力
🔔
•
像素级还原: 1:1 还原 Figma 设计
•
自动化生成: 从设计到代码的自动转换
•
技术栈适配: 自动转换为项目的技术栈
•
资源管理: 自动下载和管理设计资源
二、架构设计
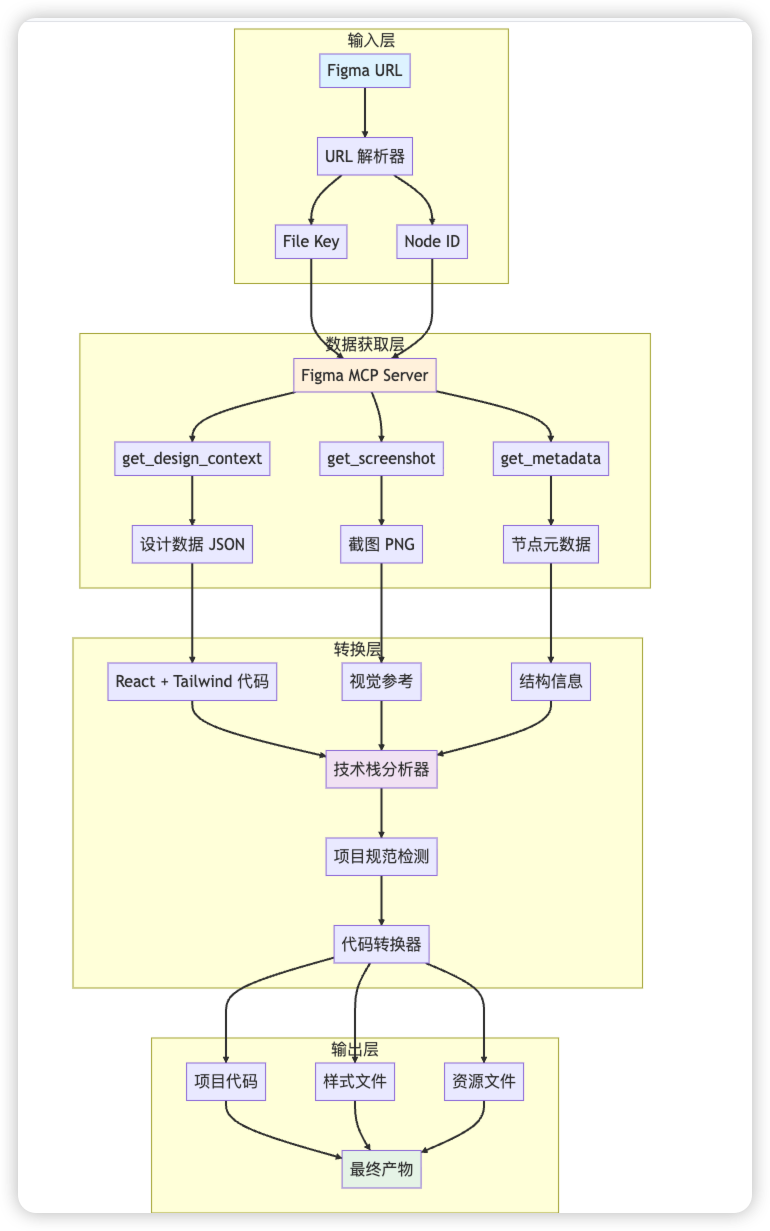
figma-implement-design skill 整体架构
🔔
核心组件
URL 解析器: 提取 Figma 文件信息
MCP 客户端: 与 Figma MCP 服务器通信
代码生成器: 将设计数据转换为代码
技术栈适配器: 适配不同的项目技术栈
资源管理器: 处理图片、图标等资源
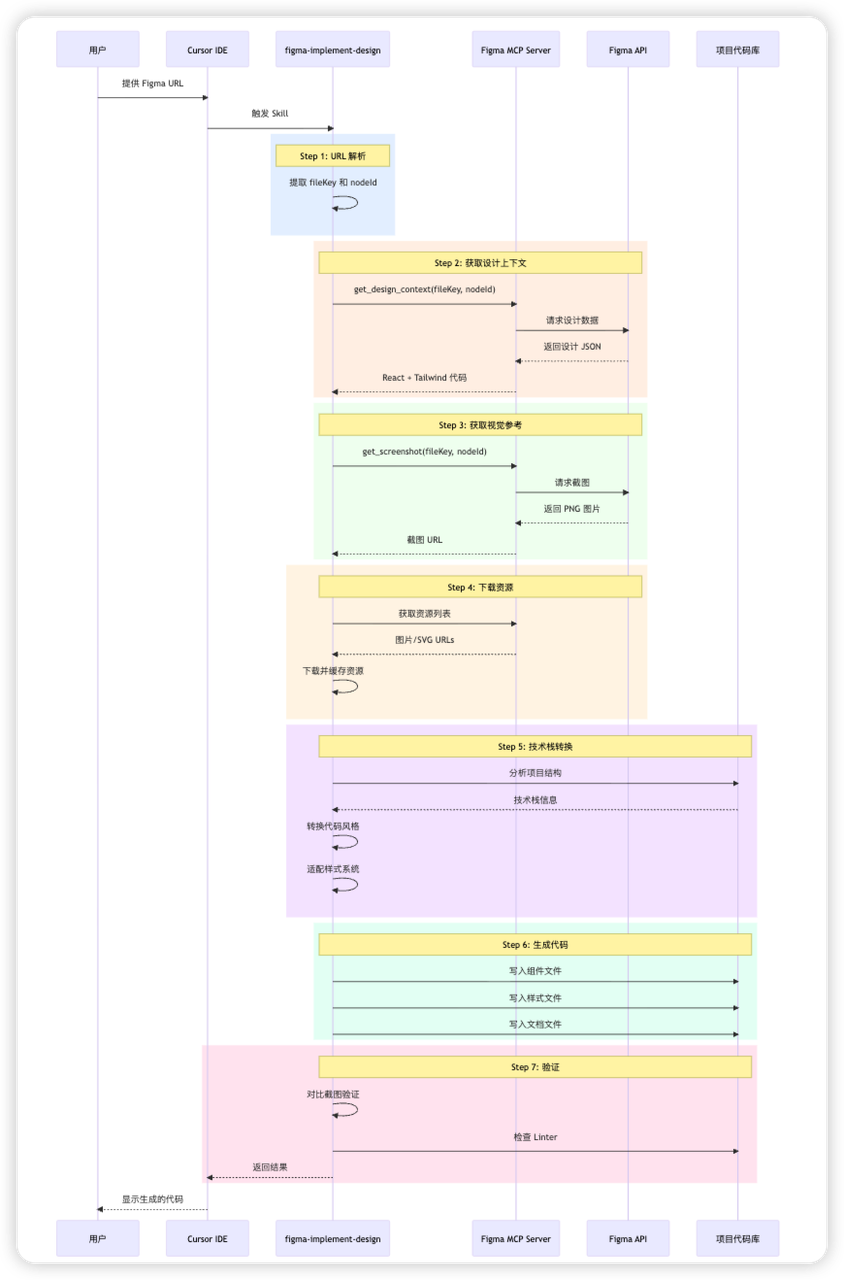
三、figma-implement-design 执行流程详解
流程图
详细步骤
Step 0: 前置检查
目的: 确保 Figma MCP 服务器可用
执行内容:
代码块
Go
// 检查 MCP 服务器连接
const mcpServers = await listMcpServers();
if (!mcpServers.includes('Figma')) {
throw new Error('Figma MCP 未配置');
}
产出物: 无(验证通过则继续)
Step 1: URL 解析
目的: 从 Figma URL 中提取关键信息
输入:
代码块
Go
https://www.figma.com/design/AOD2AAAAAAAA/Test?node-id=1026-159&m=dev
执行逻辑:
代码块
Go
function parseFigmaUrl(url) {
// URL 格式: https://figma.com/design/:fileKey/:fileName?node-id=1-2
const urlPattern = /figma\.com\/design\/([^\/]+)\/[^?]+\?node-id=([^&]+)/;
const match = url.match(urlPattern);
产出物:
代码块
Go
{
"fileKey": "AOD28JhGgpFgdnslX31UnK",
"nodeId": "1026-159"
}
Step 2: 获取设计上下文
目的: 获取设计的结构化数据和初始代码
MCP 调用:
代码块
Go
const designContext = await callMcpTool({
server: 'user-Figma',
toolName: 'get_design_context',
arguments: {
fileKey: 'AOD28JhGgpFgdnslX31UnK',
nodeId: '1026-159'
}
});
Figma MCP 处理流程
产出物:
代码块
Go
// React + Tailwind 代码
const imgEllipse1115 = "https://www.figma.com/api/mcp/asset/fd406add...";
const img262 = "https://www.figma.com/api/mcp/asset/59b1f8cb...";
export default function TestCoins() {
return (
{/* 组件内容 */}
);
}
包含信息:
•
组件结构 (JSX)
•
Tailwind 样式类
•
图片资源 URLs
•
数据属性 (data-node-id)
Step 3: 获取视觉参考
目的: 获取设计的截图作为视觉验证基准
MCP 调用:
代码块
Go
const screenshot = await callMcpTool({
server: 'user-Figma',
toolName: 'get_screenshot',
arguments: {
fileKey: 'AOD28JhGgpFgdnslX31UnK',
nodeId: '1026-159'
产出物:
•
PNG 格式的截图
•
尺寸: 与设计稿实际尺寸一致
•
用途: 作为视觉验证的"真相来源"
Step 4: 下载资源
目的: 下载设计中使用的所有图片和 SVG 资源
执行逻辑:
代码块
Go
// 从 Step 2 的代码中提取资源 URLs
const assetUrls = extractAssetUrls(designContext);
// 资源列表
产出物:
代码块
Go
// 资源常量映射
const ASSETS = {
ellipse1115: 'https://www.figma.com/api/mcp/asset/fd406add...',
img262: 'https://www.figma.com/api/mcp/asset/59b1f8cb...',
// ... 更多资源
注意: 这些 URLs 有效期为 7 天
Step 5: 技术栈转换
目的: 将 React + Tailwind 代码转换为项目的技术栈
5.1 分析项目技术栈
代码块
Go
async function analyzeProjectStack(projectPath) {
// 检查 package.json
const packageJson = await readFile(`${projectPath}/package.json`);
// 检查配置文件
const hasVite = exists(`${projectPath}/vite.config.js`);
const hasWebpack = exists(`${projectPath}/webpack.config.js`);
产出物:
代码块
Go
{
"framework": "React",
"bundler": "Vite",
"styling": "SCSS",
"typescript": false,
"designSystem": {
5.2 转换代码
代码块
Go
function convertToProjectStack(tailwindCode, projectStack) {
if (projectStack.styling === 'SCSS') {
return convertTailwindToScss(tailwindCode);
} else if (projectStack.styling === 'CSS Modules') {
return convertTailwindToCssModules(tailwindCode);
}
// ... 其他转换
}
转换示例:
输入 (Tailwind):
代码块
Go
{/* 内容 */}
输出 (SCSS):
代码块
Go
{/* 内容 */}
代码块
Go
.component-quest {
position: relative;
width: 100%;
height: 100%;
background: white;
box-shadow: 0px 2px 2px 0px rgba(0, 0, 0, 0.25);
}
.cmponent-quest-gradient {
position: absolute;
height: 1026px;
background: linear-gradient(180deg, #abd3ff 5%, #eff3ff 28.654%);
}
5.3 适配设计系统
代码块
Go
产出物: 符合项目规范的代码
Step 6: 生成代码文件
目的: 创建最终的代码文件
6.1 组件文件
代码块
Go
6.2 样式文件
代码块
Go
// ComponentA.scss
.component-quest {
position: relative;
width: 100%;
min-height: 100vh;
background: linear-gradient(180deg, #abd3ff 5%, #eff3ff 28.654%);
// ... 更多样式
}
6.3 文档文件
代码块
Go
产出物:
代码块
Go
src/ComponentA/
Step 7: 验证
目的: 确保生成的代码质量
7.1 视觉验证
代码块
Go
// 对比生成的代码渲染结果与 Figma 截图
function validateVisual(generatedCode, screenshot) {
// 1. 渲染生成的代码
const rendered = renderComponent(generatedCode);
// 2. 截图对比
const similarity = compareImages(rendered, screenshot);
7.2 代码质量检查
代码块
Go
// 运行 Linter
产出物:
代码块
Go
{
"visual": {
"similarity": 0.98,
"passed": true
},
"linter": {
"errors": 0,
四、Figma MCP 核心技术实现
URL 解析器
代码块
Go
class FigmaUrlParser {
static parse(url) {
// 支持多种 URL 格式
const patterns = [
MCP 客户端
代码块
Go
class FigmaMcpClient {
async getDesignContext(fileKey, nodeId) {
returnawaitthis.callTool('get_design_context', {
fileKey,
nodeId
});
}
async getScreenshot(fileKey, nodeId) {
returnawaitthis.callTool('get_screenshot', {
fileKey,
nodeId
});
}
async getMetadata(fileKey, nodeId) {
returnawaitthis.callTool('get_metadata', {
fileKey,
nodeId
});
代码转换器
代码块
Go
class CodeConverter {
convertTailwindToScss(jsxCode) {
资源管理器
代码块
Go
class AssetManager {
技术栈检测器
代码块
Go
class TechStackDetector {
async detect(projectPath) {
const stack = {
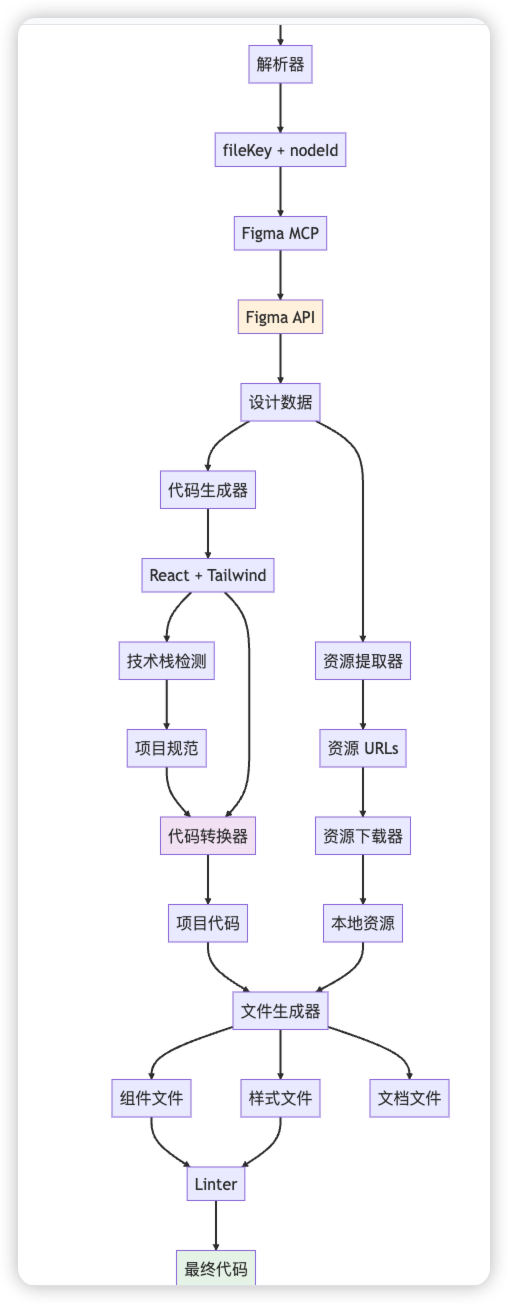
五、数据流转
完整数据流
从输入Figma URL 开始
数据格式示例
Figma 设计数据:
代码块
Go
生成的代码数据:
代码块
Go
六、Figma mcp 性能优化
并行处理
代码块
Go
async function generateCode(fileKey, nodeId) {
// 并行获取数据
const [designContext, screenshot, metadata] = awaitPromise.all([
getDesignContext(fileKey, nodeId),
getScreenshot(fileKey, nodeId),
getMetadata(fileKey, nodeId)
]);
// 并行下载资源
const assets = awaitPromise.all(
缓存机制
代码块
Go
class Cache {
constructor() {
this.designCache = newMap();
this.assetCache = newMap();
}
async getDesignContext(fileKey, nodeId) {
const key = `${fileKey}:${nodeId}`;
增量更新
代码块
Go
async function updateDesign(fileKey, nodeId, previousCode) {
// 获取新的设计数据
const newDesign = await getDesignContext(fileKey, nodeId);
七、错误处理
错误类型
代码块
Go
class FigmaSkillError extends Error {
constructor(type, message, context) {
super(message);
this.type = type;
错误处理流程
重试机制
代码块
Go
async function withRetry(fn, maxRetries = 3) {
let lastError;
for (let i = 0; i < maxRetries; i++) {
try {
returnawait fn();
} catch (error) {
八、最佳实践
Figma 设计规范
🔔
✅ 推荐做法:
•
使用 Auto Layout
🔔
❌ 避免:
•
过度嵌套
•
使用绝对定位(除非必要)
•
混乱的命名
•
未组件化的重复元素
代码生成策略
代码块
Go
资源管理策略
代码块
Go
// 开发环境: 使用 Figma URLs
九、总结
Figma MCP + Skill 转换设计稿转换代码核心流程Figma URL → 解析 → MCP 调用 → 获取数据 → 转换代码 → 生成文件 → 验证
关键技术点梳理
🔔
URL 解析: 提取 fileKey 和 nodeId
MCP 通信: 与 Figma API 交互
代码生成: 将设计数据转为代码
技术栈适配: 适配不同项目
资源管理: 处理图片等资源
一些局限性和问题
🔔
•
⏰ 资源有效期: Figma URLs 7 天过期
•
🎨 复杂设计: 极复杂的设计可能需要手动调整
•
🔧 业务逻辑: 只生成 UI,业务逻辑需手动实现
•
📱 响应式: 需要根据设计调整响应式逻辑